Face Mask Detection using PaddlePaddle
In this tutorial, we will be using pretrained PaddlePaddle model from PaddleHub to do mask detection on the sample image. To complete this procedure, there are two steps needs to be done:
- Recognize face on the image (no matter wearing mask or not) using Face object detection model
- classify the face is wearing mask or not
These two steps will involve two paddle models. We will implement the corresponding preprocess and postprocess logic to it.
Import dependencies and classes
PaddlePaddle is one of the Deep Engines that requires DJL hybrid mode to run inference. Itself does not contains NDArray operations and needs a supplemental DL framework to help with that. So we import Pytorch DL engine as well in here to do the processing works.
// %mavenRepo snapshots https://oss.sonatype.org/content/repositories/snapshots/
%maven ai.djl:api:0.27.0
%maven ai.djl.paddlepaddle:paddlepaddle-model-zoo:0.27.0
%maven org.slf4j:slf4j-simple:1.7.36
// second engine to do preprocessing and postprocessing
%maven ai.djl.pytorch:pytorch-engine:0.27.0
import ai.djl.*;
import ai.djl.inference.*;
import ai.djl.modality.*;
import ai.djl.modality.cv.*;
import ai.djl.modality.cv.output.*;
import ai.djl.modality.cv.transform.*;
import ai.djl.modality.cv.translator.*;
import ai.djl.modality.cv.util.*;
import ai.djl.ndarray.*;
import ai.djl.ndarray.types.Shape;
import ai.djl.repository.zoo.*;
import ai.djl.translate.*;
import java.io.*;
import java.nio.file.*;
import java.util.*;
Face Detection model
Now we can start working on the first model. The model can do face detection and require some additional processing before we feed into it:
- Resize: Shrink the image with a certain ratio to feed in
- Normalize the image with a scale
Fortunatly, DJL offers a Translator interface that can help you with these processing. The rough Translator architecture looks like below:
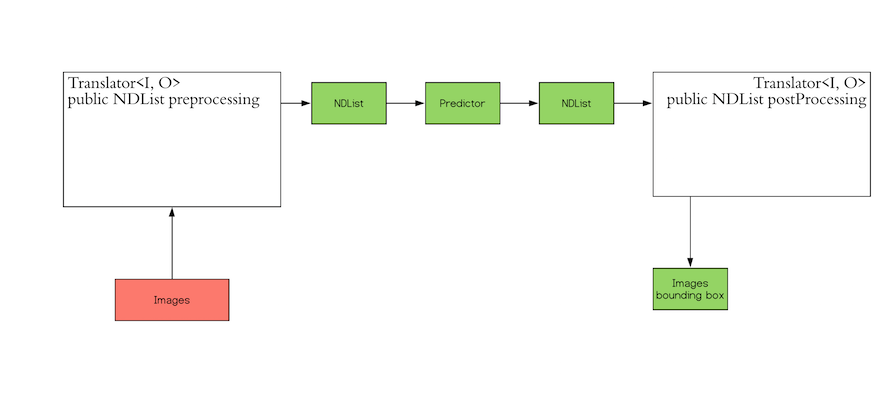
In the following sections, we will implement a FaceTranslator class to do the work.
Preprocessing
In this stage, we will load an image and do some preprocessing work to it. Let's load the image first and take a look at it:
String url = "https://raw.githubusercontent.com/PaddlePaddle/PaddleHub/release/v1.5/demo/mask_detection/python/images/mask.jpg";
Image img = ImageFactory.getInstance().fromUrl(url);
img.getWrappedImage();

Then, let's try to apply some transformation to it:
NDList processImageInput(NDManager manager, Image input, float shrink) {
NDArray array = input.toNDArray(manager);
Shape shape = array.getShape();
array = NDImageUtils.resize(
array, (int) (shape.get(1) * shrink), (int) (shape.get(0) * shrink));
array = array.transpose(2, 0, 1).flip(0); // HWC -> CHW BGR -> RGB
NDArray mean = manager.create(new float[] {104f, 117f, 123f}, new Shape(3, 1, 1));
array = array.sub(mean).mul(0.007843f); // normalization
array = array.expandDims(0); // make batch dimension
return new NDList(array);
}
processImageInput(NDManager.newBaseManager(), img, 0.5f);
As you can see above, we convert the image to a NDArray with shape following (number_of_batches, channel (RGB), height, width). This is the required input for the model to run object detection.
Postprocessing
For postprocessing, The output is in shape of (number_of_boxes, (class_id, probability, xmin, ymin, xmax, ymax)). We can store them into the prebuilt DJL DetectedObjects classes for further processing. Let's assume we have an inference output of ((1, 0.99, 0.2, 0.4, 0.5, 0.8)) and try to draw this box out.
DetectedObjects processImageOutput(NDList list, List<string> className, float threshold) {
NDArray result = list.singletonOrThrow();
float[] probabilities = result.get(":,1").toFloatArray();
List<string> names = new ArrayList<>();
List<double> prob = new ArrayList<>();
List<boundingbox> boxes = new ArrayList<>();
for (int i = 0; i < probabilities.length; i++) {
if (probabilities[i] >= threshold) {
float[] array = result.get(i).toFloatArray();
names.add(className.get((int) array[0]));
prob.add((double) probabilities[i]);
boxes.add(
new Rectangle(
array[2], array[3], array[4] - array[2], array[5] - array[3]));
}
}
return new DetectedObjects(names, prob, boxes);
}
NDArray tempOutput = NDManager.newBaseManager().create(new float[]{1f, 0.99f, 0.1f, 0.1f, 0.2f, 0.2f}, new Shape(1, 6));
DetectedObjects testBox = processImageOutput(new NDList(tempOutput), Arrays.asList("Not Face", "Face"), 0.7f);
Image newImage = img.duplicate();
newImage.drawBoundingBoxes(testBox);
newImage.getWrappedImage();

Create Translator and run inference
After this step, you might understand how process and postprocess works in DJL. Now, let's do something real and put them together in a single piece:
class FaceTranslator implements NoBatchifyTranslator<image, detectedobjects=""> {
private float shrink;
private float threshold;
private List<string> className;
FaceTranslator(float shrink, float threshold) {
this.shrink = shrink;
this.threshold = threshold;
className = Arrays.asList("Not Face", "Face");
}
@Override
public DetectedObjects processOutput(TranslatorContext ctx, NDList list) {
return processImageOutput(list, className, threshold);
}
@Override
public NDList processInput(TranslatorContext ctx, Image input) {
return processImageInput(ctx.getNDManager(), input, shrink);
}
}
To run inference with this model, we need to load the model from Paddle model zoo. To load a model in DJL, you need to specify a Criteria. Criteria is used identify where to load the model and which Translator should apply to it. Then, all we need to do is to get a Predictor from the model and use it to do inference:
Criteria<image, detectedobjects=""> criteria = Criteria.builder()
.setTypes(Image.class, DetectedObjects.class)
.optModelUrls("djl://ai.djl.paddlepaddle/face_detection/0.0.1/mask_detection")
.optFilter("flavor", "server")
.optTranslator(new FaceTranslator(0.5f, 0.7f))
.build();
var model = criteria.loadModel();
var predictor = model.newPredictor();
DetectedObjects inferenceResult = predictor.predict(img);
newImage = img.duplicate();
newImage.drawBoundingBoxes(inferenceResult);
newImage.getWrappedImage();

As you can see above, it brings you three faces detections.
Mask Classification model
So, once we have the image location ready, we can crop the image and feed it to the Mask Classification model for further processing.
Crop the image
The output of the box location is a value from 0 - 1 that can be mapped to the actual box pixel location if we simply multiply by width/height. For better accuracy on the cropped image, we extend the detection box to square. Let's try to get a cropped image:
int[] extendSquare(
double xmin, double ymin, double width, double height, double percentage) {
double centerx = xmin + width / 2;
double centery = ymin + height / 2;
double maxDist = Math.max(width / 2, height / 2) * (1 + percentage);
return new int[] {
(int) (centerx - maxDist), (int) (centery - maxDist), (int) (2 * maxDist)
};
}
Image getSubImage(Image img, BoundingBox box) {
Rectangle rect = box.getBounds();
int width = img.getWidth();
int height = img.getHeight();
int[] squareBox =
extendSquare(
rect.getX() * width,
rect.getY() * height,
rect.getWidth() * width,
rect.getHeight() * height,
0.18);
return img.getSubImage(squareBox[0], squareBox[1], squareBox[2], squareBox[2]);
}
List<detectedobjects.detectedobject> faces = inferenceResult.items();
getSubImage(img, faces.get(2).getBoundingBox()).getWrappedImage();

Prepare Translator and load the model
For the face classification model, we can use DJL prebuilt ImageClassificationTranslator with a few transformation. This Translator brings a basic image translation process and can be extended with additional standard processing steps. So in our case, we don't have to create another Translator and just leverage on this prebuilt one.
var criteria = Criteria.builder()
.setTypes(Image.class, Classifications.class)
.optModelUrls("djl://ai.djl.paddlepaddle/mask_classification/0.0.1/mask_classification")
.optFilter("flavor", "server")
.optTranslator(
ImageClassificationTranslator.builder()
.addTransform(new Resize(128, 128))
.addTransform(new ToTensor()) // HWC -> CHW div(255)
.addTransform(
new Normalize(
new float[] {0.5f, 0.5f, 0.5f},
new float[] {1.0f, 1.0f, 1.0f}))
.addTransform(nd -> nd.flip(0)) // RGB -> GBR
.build())
.build();
var classifyModel = criteria.loadModel();
var classifier = classifyModel.newPredictor();
Run inference
So all we need to do is to apply the previous implemented functions and apply them all together. We firstly crop the image and then use it for inference. After these steps, we create a new DetectedObjects with new Classification classes:
List<string> names = new ArrayList<>();
List<double> prob = new ArrayList<>();
List<boundingbox> rect = new ArrayList<>();
for (DetectedObjects.DetectedObject face : faces) {
Image subImg = getSubImage(img, face.getBoundingBox());
Classifications classifications = classifier.predict(subImg);
names.add(classifications.best().getClassName());
prob.add(face.getProbability());
rect.add(face.getBoundingBox());
}
newImage = img.duplicate();
newImage.drawBoundingBoxes(new DetectedObjects(names, prob, rect));
newImage.getWrappedImage();
